The Role of Axial Roof Exhaust Fans: Enhancing Ventilation and Indoor Air Quality

Introduction


In today’s modern built environment, proper ventilation and indoor air quality (IAQ) are of utmost importance. To achieve efficient air circulation and maintain a healthy indoor environment, axial roof exhaust fans play a vital role. These specialized fans are designed to remove stale air, pollutants, and excess heat from buildings. In this article, we will explore the significant role of axial roof exhaust fans in enhancing ventilation and improving indoor air quality, benefiting a wide range of industries and applications.

Understanding Axial Roof Exhaust Fans

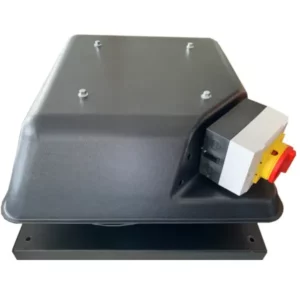
Axial roof exhaust fans are ventilation systems specifically designed to expel air from enclosed spaces, such as commercial buildings, factories, warehouses, and industrial facilities. They consist of a motor-driven fan enclosed within a housing, usually installed on the roof or high points of a structure. The fan blades rotate in an axial direction, pulling air upward and expelling it outside, creating a negative pressure that encourages fresh air intake from other openings.

Enhancing Ventilation and Indoor Air Quality

  1. Efficient Air Exchange:
    Axial roof exhaust fans excel at removing stale air and odors from enclosed spaces. By expelling the air at high volumes and velocities, these fans create a negative pressure that draws fresh air in from open doors, windows, or dedicated intake vents. This constant air exchange helps maintain a healthy and comfortable indoor environment.
  2. Heat Dissipation:
    In industrial and commercial settings where excess heat is generated, axial roof exhaust fans play a crucial role in heat dissipation. They exhaust hot air, fumes, and heat generated by machinery, processes, or other sources, preventing heat buildup and improving working conditions.
  3. Moisture and Humidity Control:
    Axial roof exhaust fans are effective in controlling moisture and humidity levels in various environments. By expelling humid air, they reduce the risk of condensation, mold growth, and moisture-related damages. This is particularly important in areas such as bathrooms, kitchens, swimming pools, and manufacturing facilities where moisture control is critical.
  4. Removal of Airborne Pollutants:
    In environments where airborne contaminants are present, such as chemical laboratories, workshops, or manufacturing plants, axial roof exhaust fans aid in removing harmful particles, gases, and fumes. The fans expel these pollutants directly outside, mitigating potential health hazards and maintaining a safer working environment for employees.
  5. Energy Efficiency:
    Axial roof exhaust fans are designed to be energy-efficient, with features like variable speed controls and advanced motor technologies. These features allow for optimized fan operation based on the specific ventilation requirements, minimizing energy consumption and reducing operational costs.

Applications of Axial Roof Exhaust Fans

  1. Commercial and Office Buildings:
    Axial roof exhaust fans are used in commercial buildings, offices, and retail spaces to ensure proper ventilation, remove odors, and improve IAQ for occupants. They are particularly important in areas with limited natural ventilation, such as basements and enclosed parking lots.
  2. Industrial and Manufacturing Facilities:
    In industrial and manufacturing settings, axial roof exhaust fans are indispensable for removing heat, fumes, and airborne contaminants generated by processes and machinery. They help maintain a safe and comfortable working environment while ensuring compliance with health and safety regulations.
  3. Warehouses and Distribution Centers:
    Axial roof exhaust fans are employed in warehouses and distribution centers to facilitate air exchange, control humidity, and prevent heat buildup. These fans assist in maintaining optimal conditions for stored goods, protecting them from moisture damage and maintaining a comfortable working environment for employees.
  4. Hospitality and Food Service:
    In restaurants, commercial kitchens, and food processing facilities, axial roof exhaust fans are crucial for eliminating cooking odors, smoke, and excess heat. By expelling these pollutants, the fans contribute to a cleaner and more comfortable environment for staff and customers.

Conclusion

Axial roof exhaust fans play a significant role in enhancing ventilation and improving indoor air quality in various applications. By efficiently expelling stale air, excess heat, moisture, and airborne pollutants, these fans contribute to a healthier and more comfortable indoor environment. Their usage in commercial buildings, axial roof exhaust fan industrial facilities, warehouses, and hospitality establishments ensures compliance with ventilation standards, reduces health risks, and enhances overall occupant well-being. With ongoing advancements in fan technology, axial roof exhaust fans continue to evolve as indispensable components of modern building ventilation systems.

axial roof exhaust fan

How are Megger Tests used in acceptance testing for electrical installations?

Megger Tests are an essential part of acceptance testing for electrical installations, ensuring that the installation meets safety and performance standards.

Here’s how Megger Tests are used in acceptance testing for electrical installations:

  1. Safety Verification: Megger Tests are conducted to verify that the insulation of electrical conductors and components is in good condition and safe for operation. This is especially important for new installations to ensure that insulation has not been damaged during the installation process.
  2. Insulation Resistance Measurement: Megger Tests measure the insulation resistance of the electrical components and wiring in the installation. The tester applies a high DC voltage to assess the resistance to current flow through the insulation. The results are typically provided in ohms (Ω).
  3. Acceptance Criteria: Acceptance criteria for insulation resistance vary depending on the specific installation, local regulations, and industry standards. Electrical codes often define the minimum acceptable insulation resistance values for various types of installations.
  4. Compliance with Standards: Acceptance testing ensures that the installation complies with relevant electrical codes and standards, such as the National Electrical Code (NEC) in the United States or the International Electrotechnical Commission (IEC) standards in other regions.
  5. Documentation: The results of Megger Tests are documented as part of the acceptance testing process. Test reports should include details about the tested components, the test conditions, and the measured insulation resistance values.
  6. Equipment Checks: Megger Tests are not limited to insulation resistance measurement. They can also be used to test the insulation of individual components such as cables, motors, transformers, and other electrical equipment. This ensures that all components within the installation meet safety and performance requirements.
  7. Troubleshooting: If Megger Tests reveal low insulation resistance values, acceptance testing may include troubleshooting to identify and rectify any issues in the installation. Common problems such as moisture ingress, damaged insulation, or improper installation can be addressed.
  8. Safety Certification: Once the installation passes the Megger Tests and meets all relevant criteria, it can be certified as safe and compliant. This certification is often required before an electrical installation can be put into service.
  9. Verification of Installation Quality: Megger Tests help verify the quality of the installation workmanship and the effectiveness of insulation materials used. Acceptance testing identifies potential defects that may have occurred during the installation process.
  10. Preventive Maintenance Planning: The results of Megger Tests obtained during acceptance testing can serve as baseline data for future maintenance and testing. This information can help in planning preventive maintenance to ensure the continued safety and reliability of the electrical installation.

In summary, Megger Tests in acceptance testing for electrical installations are crucial for confirming that the installation meets safety and performance standards. They provide valuable data for certification and serve as a foundation for ongoing maintenance and troubleshooting efforts. The acceptance testing process ensures that the electrical installation is safe and complies with relevant electrical codes and standards.

What safety precautions should be followed when using a Megger Tester?

Safety is a top priority when using a Megger Tester, as it involves applying high voltage to electrical systems. Adhering to proper safety precautions is essential to prevent accidents and ensure the well-being of the personnel conducting the tests.

Here are important safety precautions to follow when using a Megger Tester:

  1. Training and Qualifications:
    • Ensure that individuals using the Megger Tester are properly trained, qualified, and knowledgeable about its operation and the associated risks.
  2. Personal Protective Equipment (PPE):
    • Wear appropriate PPE, which may include insulating gloves, safety glasses, and protective clothing, to protect against electrical hazards.
  3. Equipment Inspection:
    • Before each use, visually inspect the Megger Tester for any signs of damage, wear, or defects. Ensure that cables, connectors, and the tester itself are in good condition.
  4. Grounding:
    • Ensure that the equipment being tested is properly grounded to prevent electrical accidents and ensure the safety of personnel.
  5. Safe Test Environment:
    • Conduct tests in a well-ventilated, controlled environment that is free from potential electrical hazards, megger tester such as water or conductive materials. Remove any flammable materials from the area.
  6. Risk Assessment:
    • Perform a risk assessment before the test to identify potential hazards and develop a safety plan to mitigate them.
  7. De-Energization:
    • Ensure that the equipment being tested is de-energized and disconnected from the power source before conducting Megger Tests. Follow proper lockout/tagout procedures.
  8. Discharge Equipment:
    • After completing the test, discharge any stored energy in the equipment under test to prevent accidental discharges or electrical shocks during disconnection.
  9. Proper Test Setup:
    • Follow the manufacturer’s instructions for setting up the Megger Tester and connecting it to the equipment. Ensure that all connections are secure.
  10. Safe Test Voltage:
    • Use the appropriate test voltage based on the equipment and insulation being tested. Excessive voltage can lead to insulation breakdown.
  11. Test Sequence:
    • Establish a test sequence that minimizes the risk of personnel exposure to high voltage. Start with a low voltage and increase it gradually.
  12. Monitoring:
    • Continuously monitor the test equipment and the test environment during the test to detect any anomalies or safety concerns.
  13. Emergency Procedures:
    • Develop and communicate clear emergency procedures for handling accidents, electrical faults, or unexpected events. Personnel should know how to respond in case of an emergency.
  14. Safety Barriers:
    • Use safety barriers, warning signs, and controlled access to establish a safe zone around the testing area to prevent unauthorized access.
  15. Calibration and Maintenance:
    • Regularly calibrate and maintain the Megger Tester according to the manufacturer’s recommendations to ensure its accuracy and reliability.
  16. Knowledge Sharing:
    • Share knowledge of the potential electrical hazards and safety procedures with all personnel involved in the testing process.

Compliance with these safety precautions is essential for conducting Megger Tests safely and effectively. It is crucial to protect personnel, prevent electrical accidents, and ensure the reliable assessment of insulation resistance in electrical systems and equipment.

What is an OEM Karl Fischer Moisture Analyzer, and how does it function in moisture content analysis?

An OEM Karl Fischer Moisture Analyzer is an analytical instrument used to measure the moisture content of various substances accurately. It is based on the Karl Fischer titration method, which is a widely recognized and precise technique for moisture analysis.

Here’s an explanation of what an OEM Karl Fischer Moisture Analyzer is and how it functions in moisture content analysis:

OEM Karl Fischer Moisture Analyzer:

  • An OEM Karl Fischer Moisture Analyzer is a specialized moisture measurement device that can be incorporated into other equipment or systems as an original equipment manufacturer (OEM) component. It is designed to provide moisture content data in real-time or as part of an integrated process.

Function in Moisture Content Analysis:

  • The Karl Fischer titration method is used to determine the moisture content in various materials. It relies on the chemical reaction between water (moisture) and a Karl Fischer reagent.
  • Here’s how the OEM Karl Fischer Moisture Analyzer typically functions:
    1. Sample Introduction: A small sample of the material being tested is introduced into the analyzer. This can be done through various means, including automated sample handling systems.
    2. Titration Cell: The sample is mixed with a Karl Fischer reagent solution in a titration cell. The reagent contains chemicals that react specifically with water molecules.
    3. Chemical Reaction: Water molecules in the sample react with the Karl Fischer reagent, producing a change in the titration cell’s electrical properties. This change is directly proportional to the amount of moisture present.
    4. End Point Detection: The analyzer continuously measures this change until it reaches a stable endpoint, indicating that all the moisture in the sample has reacted.
    5. Calculation: The analyzer calculates the moisture content based on the volume of reagent consumed during the titration, and this value is typically displayed on a screen or transmitted to a control system.

Significance:

  • Accurate moisture content analysis is critical in various industries, including pharmaceuticals, food production, chemical manufacturing, and materials science.
  • In the pharmaceutical industry, it ensures the quality and stability of drug formulations.
  • In food production, it helps maintain product quality, shelf life, and safety.
  • In materials science, it assists in understanding the effects of moisture on materials’ properties.

OEM Karl Fischer Moisture Analyzers serve as valuable components in industrial processes and quality control, allowing for real-time monitoring and control of moisture levels to ensure product quality and consistency. These analyzers are commonly integrated into production lines and laboratory equipment, enabling manufacturers to meet specific moisture content standards and regulations.

How is the accuracy and reliability of moisture content testing ensured, including calibration and quality control measures?

Ensuring the accuracy and reliability of moisture content testing, including calibration and quality control measures, is crucial to obtaining precise and consistent results.

Here are some key steps and considerations for maintaining the accuracy and reliability of moisture content analysis:

  1. Calibration:
    • Regular calibration of the Karl Fischer reagents and the analyzer is essential. Calibration involves establishing a relationship between the instrument’s response and the known moisture content of standard samples.
    • Calibrate the instrument with a range of samples that span the expected moisture content of the materials being tested.
  2. Standard Operating Procedures (SOPs):
    • Develop and follow standardized operating procedures for sample preparation, analysis, and data recording. OEM Karl Fischer Moisture Analyzer Content Ensure that personnel are trained on these procedures.
    • SOPs should include details on sample size, sample handling, reagent preparation, and titration conditions.
  3. Quality Control Samples:
    • Analyze quality control samples regularly to check the performance of the analyzer. These samples should be of known moisture content and used to verify that the instrument is functioning correctly.
    • Quality control samples can be internal standards or certified reference materials.
  4. Reagent Handling:
    • Store Karl Fischer reagents properly, following the manufacturer’s recommendations for storage temperature and handling procedures.
    • Ensure that reagents are replaced when they approach their expiry date to maintain accuracy.
  5. Blank Determinations:
    • Conduct blank determinations by analyzing reagent and solvent alone (without a sample) to account for any background moisture content. This ensures that the analyzer is not detecting moisture from the reagents or environment.
  6. Instrument Maintenance:
    • Regularly maintain and service the analyzer as per the manufacturer’s guidelines. This includes cleaning, replacing worn components, and ensuring that the electrodes and titration cell are in good condition.
  7. Temperature and Humidity Control:
    • Maintain consistent temperature and humidity conditions in the laboratory or testing environment. Variations in temperature and humidity can affect the results.
  8. Sample Handling:
    • Handle samples with care to avoid contamination. Use clean and dry utensils and containers for sample preparation.
    • Minimize exposure of samples to the ambient environment to prevent moisture absorption or evaporation.
  9. Data Validation:
    • Implement data validation checks to identify and address irregularities or outliers in the results.
    • Review the results for consistency and ensure that they align with the expected values for the materials being tested.
  10. Training and Competency:
    • Ensure that personnel operating the analyzer are adequately trained and competent in using the equipment and conducting moisture content analysis.
  11. Documentation:
    • Maintain detailed records of calibration, quality control, and analysis procedures. These records are essential for traceability and audit purposes.
  12. Audit and Review:
    • Periodically audit the moisture content testing process to identify areas for improvement and ensure adherence to quality control measures.

By consistently following these measures and guidelines, laboratories and industries can maintain the accuracy and reliability of moisture content testing using Karl Fischer Moisture Analyzers. This is critical for quality assurance and compliance with industry standards and regulations.

What are the safety considerations and precautions that should be taken when using a flash point analyzer in transformer oil testing?

Safety is a paramount concern when using a Flash Point Analyzer in transformer oil testing. The flash point test involves flammable materials, so it’s essential to follow safety precautions to protect both personnel and equipment.

Here are important safety considerations and precautions:

  1. Personal Protective Equipment (PPE):
    • Wear appropriate PPE, including lab coats, safety glasses, gloves, and closed-toe shoes. Ensure that no skin is exposed, as flash point tests involve flammable substances.
  2. Ventilation:
    • Perform the test in a well-ventilated area or under a fume hood to prevent the buildup of flammable vapors. Ensure that the testing area is free from open flames, sparks, or any potential sources of ignition.
  3. Fire Extinguishers:
    • Have fire extinguishers readily available in the testing area, especially those suitable for Class B fires, which involve flammable liquids.
  4. No Smoking or Open Flames:
    • Strictly prohibit smoking and the presence of open flames in the testing area.
  5. Avoid Static Electricity:
    • Minimize static electricity by using anti-static flooring, footwear, or clothing. Ensure that electrical equipment is properly grounded.
  6. Emergency Shutdown Procedures:
    • Establish and communicate emergency shutdown procedures, including how to stop the test and evacuate the area in case of an emergency.
  7. Spill Control:
    • Have spill control kits and absorbent materials on hand to quickly respond to any accidental spills or leaks of transformer oil.
  8. Equipment Inspection:
    • Regularly inspect the Flash Point Analyzer to ensure it’s in good working condition. Any damaged or malfunctioning components should be addressed promptly.
  9. Safe Sample Handling:
    • Handle transformer oil samples with care and avoid spilling or splashing. Use designated containers and tools for sample collection and transfer.
  10. Calibration and Verification:
    • Regularly calibrate and verify the Flash Point Analyzer according to manufacturer guidelines to maintain accurate results.
  11. Training and Competency:
    • Ensure that personnel operating the analyzer are properly trained and competent in conducting flash point tests. Training should cover safety procedures, operation of the equipment, and interpretation of results.
  12. Flammable Liquid Storage:
    • Store flammable liquids, including transformer oil samples, in approved containers and areas. Follow relevant regulations and safety guidelines for storage.
  13. Labeling and Documentation:
    • Clearly label all containers with the contents, hazards, and appropriate safety information. Maintain records of flash point test results and safety practices.
  14. Emergency Response Plan:
    • Develop an emergency response plan that includes contact information for relevant authorities, emergency services, and hazardous materials handling.
  15. Regular Safety Audits:
    • Conduct regular safety audits and reviews of flash point testing procedures to identify and address potential hazards or improvements.

By following these safety considerations and precautions, you can ensure a safe testing environment and minimize the risk of accidents or incidents when using a Flash Point Analyzer for transformer oil testing. Safety should always be a top priority in any laboratory or testing facility.

How frequently should transformer oil flash point testing be performed as part of routine maintenance and condition assessment for transformers?

The frequency of transformer oil flash point testing as part of routine maintenance and condition assessment for transformers can vary depending on several factors, including the type of transformers, their age, operating conditions, China Transformer Oil Flash Point Analyzer and specific industry or regulatory requirements.

However, here are some general guidelines to consider:

  1. Initial Baseline Testing: It’s common to perform an initial baseline flash point test on new transformers or after a major overhaul. This establishes a reference point for future testing.
  2. Routine Periodic Testing: For most transformers, especially those in service for an extended period, routine periodic flash point testing is advisable. The frequency can range from annually to every few years. Many utilities and industries follow an annual testing schedule as a standard practice.
  3. Type and Size of Transformers: The frequency may also be influenced by the type and size of transformers. Critical or large transformers may be tested more frequently than smaller or less critical units.
  4. Operating Conditions: Transformers operating in more severe conditions, such as high temperatures, heavy loads, or in coastal areas with high humidity, may require more frequent testing due to the increased risk of oil contamination and degradation.
  5. Historical Data: Historical test data and trend analysis can help determine the ideal testing frequency. If there is a pattern of deterioration or a sudden change in flash point values, it may prompt more frequent testing.
  6. Regulatory Requirements: Compliance with industry standards and regulations may dictate the testing frequency. Some standards, such as IEEE or IEC standards, specify minimum testing intervals.
  7. Manufacturer Recommendations: Transformer manufacturers may provide specific guidelines on routine testing frequencies and maintenance practices for their equipment.
  8. Preventive Maintenance Program: Incorporate flash point testing into a comprehensive preventive maintenance program for transformers. The program should consider a combination of tests, including dissolved gas analysis, insulation resistance, and power factor testing, along with flash point testing.
  9. Risk Assessment: Perform a risk assessment that considers the criticality of the transformers in the power distribution system. Critical transformers, those serving essential loads or in mission-critical applications, may warrant more frequent testing.
  10. Aging Transformers: As transformers age, they are more susceptible to insulation degradation. Older transformers may benefit from more frequent testing, especially if they are nearing the end of their expected service life.
  11. Emerging Issues: If there are emerging concerns, operational issues, or unusual events that may impact the transformer’s condition, consider increasing the testing frequency to monitor the situation closely.
  12. Transformer Service History: A transformer’s service history, including past maintenance records and known issues, should influence the testing schedule. Transformers with a history of problems may need more frequent assessment.

It’s essential to develop a testing and maintenance plan tailored to the specific transformer fleet and its operational context. This plan should take into account the factors mentioned above to determine the appropriate frequency for flash point testing. Regular testing helps identify potential issues early, enabling timely maintenance and extending the service life of transformers.

What is a Tan Delta Tester, and how does it function in electrical testing and diagnostics?

A Tan Delta Tester, also known as a Dissipation Factor Tester or Dielectric Loss Tester, is an electrical testing instrument used to assess the quality and integrity of electrical insulation in high-voltage equipment, cables, and systems. It primarily measures the dissipation factor (tan delta) and capacitance of insulation materials to diagnose potential issues and deterioration.

Here’s an explanation of what a Tan Delta Tester is and how it functions in electrical testing and diagnostics:

Tan Delta Tester:

  • A Tan Delta Tester is an instrument designed to measure the dissipation factor (tan delta) and capacitance of electrical insulation materials. It is commonly used for testing high-voltage electrical equipment, such as transformers, cables, capacitors, and bushings, as well as in the assessment of the quality of insulation materials.

Function in Electrical Testing and Diagnostics:

  • The primary function of a Tan Delta Tester is to evaluate the condition of insulation materials within electrical equipment. It does so by measuring the dissipation factor (tan delta) and capacitance of the insulation. The tan delta is a dimensionless quantity that represents the ratio of the resistive losses to the capacitive losses in the insulation material.
  • During the test, the Tan Delta Tester applies a low-frequency, low-voltage AC signal to the insulation. The electrical properties of the insulation material cause the signal to lag, and the phase difference between the applied voltage and the resulting current is measured. This phase difference, represented as tan delta, is an indicator of how effectively the insulation is able to store and release electrical energy.
  • High-quality insulation materials exhibit low values of tan delta, indicating minimal energy losses and efficient electrical performance. Conversely, an increase in the tan delta value suggests a deterioration of the insulation material and an increase in energy losses, potentially indicating defects or weaknesses in the insulation.
  • The Tan Delta Tester’s measurements are valuable for identifying early signs of insulation degradation, such as moisture ingress, aging, and partial discharges. By detecting these issues at an early stage, maintenance or replacement can be planned, preventing catastrophic equipment failures.
  • The test results are analyzed and compared to established industry standards and guidelines to determine the insulation’s overall condition. Significant deviations from the baseline or from acceptable values may trigger further investigation or maintenance actions.
  • Tan Delta testing is often performed during routine maintenance and condition assessment of electrical equipment, helping to ensure the reliability and safety of high-voltage systems.

In summary, a Tan Delta Tester serves the critical function of assessing the condition of electrical insulation materials by measuring the dissipation factor (tan delta) and capacitance. It is an essential tool in the diagnosis and maintenance of high-voltage electrical equipment, enabling the early detection of insulation issues and supporting the reliability and safety of electrical systems.

How does the Tan Delta test differentiate from other insulation diagnostic tests, such as insulation resistance or partial discharge testing?

The Tan Delta test is one of several diagnostic tests used to assess the condition of electrical insulation in high-voltage equipment and cables. Each test provides different information about the insulation’s quality and potential issues.

Here’s how the Tan Delta test differentiates from other insulation diagnostic tests, such as insulation resistance testing and partial discharge testing:

Tan Delta Test:

  • Purpose: The Tan Delta test primarily assesses the quality of insulation materials by measuring the dissipation factor (tan delta) and capacitance. It is sensitive to the presence of moisture, aging, and other insulation defects that affect the ability of the insulation to store and release electrical energy.
  • Frequency: It typically operates at a low-frequency range, often in the kilohertz (kHz) to megahertz (MHz) range. Tan Delta Tester 60 Kv This low frequency is necessary to measure the tan delta accurately.
  • Information: The primary information obtained from the Tan Delta test is the tan delta value, which reflects the insulation’s ability to store and release electrical energy. A high tan delta value suggests potential issues with the insulation, such as moisture or aging.

Insulation Resistance Test:

  • Purpose: Insulation resistance testing measures the resistance between two conductive components separated by insulation. It assesses the overall resistance of the insulation to the flow of electrical current. It’s primarily used to check for the presence of contaminants or conductive paths within the insulation.
  • Voltage Level: Insulation resistance testing typically uses a high-voltage DC source (often in the range of 500 V to 5 kV) to measure the resistance. The test voltage is applied for a specified duration, and the resulting resistance is measured.
  • Information: The main parameter obtained from insulation resistance testing is the insulation resistance value, usually expressed in ohms. A high resistance value indicates good insulation, while a low resistance value suggests potential contamination or damage.

Partial Discharge Test:

  • Purpose: Partial discharge testing is used to detect and evaluate partial discharges that occur within the insulation material under high voltage. Partial discharges are localized breakdowns in the insulation and are indicative of insulation weaknesses or defects.
  • Frequency: Partial discharge testing operates at power frequency (50 Hz or 60 Hz) or at higher frequencies for specific applications.
  • Information: The primary information gathered is the presence and magnitude of partial discharges. Partial discharge activity is an early sign of insulation issues and may indicate potential insulation defects or contamination.

Differences:

  • While the Tan Delta test is primarily focused on the quality of insulation materials and detecting issues like moisture ingress and aging, insulation resistance testing assesses overall insulation resistance to detect contaminants and conductive paths.
  • Partial discharge testing is specifically designed to identify partial discharges, which are early indicators of insulation defects, voids, or weaknesses. It differs from both the Tan Delta and insulation resistance tests in terms of the phenomenon it detects.
  • The choice of test depends on the specific diagnostic needs and the type of insulation issue suspected. In many cases, multiple tests are used in conjunction to provide a comprehensive assessment of insulation condition.

In summary, the Tan Delta test, insulation resistance testing, and partial discharge testing serve different purposes in insulation diagnostics, focusing on different aspects of insulation condition and potential issues. The choice of test or combination of tests depends on the diagnostic requirements and the nature of the insulation being assessed.

Discovering the Best Wet Wipes for Your Baby – Ensuring Gentle Care and Convenience

When it comes to keeping your baby fresh, clean, and comfortable, wet wipes are an essential item in every parent’s arsenal. However, with a plethora of options available, finding the best wet wipes from China Wet wipes for baby factory, for your little one can be a daunting task. In this blog post, we delve into the world of baby wet wipes, exploring the top choices that offer gentle care, superior quality, and utmost convenience. Join us as we navigate through the key features, benefits, and factors to consider when selecting the best wet wipes for your precious bundle of joy.

China Wet wipes for baby factory

Softness and Sensitivity

The best wet wipes for babies prioritize softness and sensitivity to ensure gentle care for your little one’s delicate skin. These wipes are crafted from high-quality materials, such as cotton or bamboo, which are soft and hypoallergenic. They are designed to be ultra-gentle, providing a soothing touch while effectively cleaning your baby’s sensitive areas. The softness of these wipes prevents any irritation or discomfort, making diaper changes and clean-ups a pleasant experience for both you and your baby.

Moisture and Hydration

Keeping your baby’s skin moisturized and hydrated is vital for maintaining its health and preventing dryness. The best wet wipes for babies are infused with gentle moisturizing ingredients, such as aloe vera or chamomile extracts, which help nourish and hydrate the skin. These wipes offer a refreshing and soothing sensation, ensuring that your baby’s skin remains supple and well-moisturized even during frequent use. The moisture-rich formulation of these wipes prevents dryness and helps maintain the natural balance of your baby’s skin.

Hypoallergenic and Dermatologically Tested

Babies have delicate and sensitive skin that requires extra care and attention. The wet wipe by China wet wipes for baby supplier, are hypoallergenic and dermatologically tested, making them suitable for even the most sensitive skin types. These wipes are free from harsh chemicals, such as alcohol, fragrances, and parabens, which can potentially cause skin irritation or allergies. By choosing hypoallergenic wipes, you can confidently cleanse your baby’s skin without worrying about any adverse reactions or discomfort.

Durability and Thickness

The durability and thickness of wet wipes play a crucial role in ensuring effective cleaning and preventing tearing or breakage. The best wet wipes for babies are designed to be thick and strong, allowing for easy and thorough cleaning without the worry of the wipe tearing mid-use. The durability of these wipes ensures that they can withstand gentle rubbing and wiping, making them suitable for various cleaning tasks, including diaper changes, face and hand cleaning, and general messes.

Packaging and Portability

Convenience is a significant factor when it comes to selecting the best wet wipes for babies. Consider wipes that come in a convenient packaging format, such as a resealable flip-top lid or a pop-up dispenser, which keeps the wipes moist and prevents them from drying out. Portable and travel-friendly packaging options, such as travel-sized packs or pouches, allow you to easily carry wet wipes wherever you go, ensuring that you are always prepared for any messes or clean-ups that may arise.

Conclusion

When it comes to choosing the wet wipes by China best wet wipes for baby manufacturer, considering factors such as softness, sensitivity, moisture, hypoallergenic properties, durability, and packaging can help you make an informed decision. Opting for wet wipes that prioritize these features ensures gentle care, superior quality, and utmost convenience for your little one. Whether you are using wet wipes for diaper changes, face and hand cleaning, or general messes, investing in the best wet wipes for babies guarantees a pleasant and hassle-free experience. Keep your baby fresh, clean, and comfortable with the gentle touch and convenience provided by the best wet wipes available in the market.

How do membrane switches provide tactile feedback and actuation?

Membrane switches provide tactile feedback and actuation through the use of various components and design features.

Here’s an explanation of how they achieve this:

Top Layer: The top layer of a membrane switch is typically a graphic overlay or a tactile dome layer. It is made of a flexible material with raised buttons or keys, which creates a tactile sensation when pressed. The graphic overlay can be designed to have embossed or domed areas that provide tactile feedback upon actuation.

Tactile Domes: Tactile domes are small, dome-shaped metal or polymer discs that are placed beneath each button or key on the graphic overlay. These domes are designed to collapse or deform when pressure is applied, resulting in a tactile sensation or “snap” feeling. The force required to actuate the switch and the tactile response can be customized by varying the dome size, shape, or material.

Spacer Layers: Between the graphic overlay and the bottom circuit layer, there are spacer layers made of flexible insulating materials. These layers help maintain a proper gap between the graphic overlay and the circuit layer. They also contribute to the tactile feedback by providing resistance or cushioning when the buttons are pressed.

Conductive Circuit Layer: The conductive circuit layer, also known as the bottom layer, is typically made of a flexible printed circuit board (PCB) material. This layer contains conductive traces or paths that form the electrical circuitry. When a button is pressed, it comes into contact with the conductive traces, completing the circuit and registering the actuation.

Contact Pads: Contact pads are located on the bottom surface of the graphic overlay or the top surface of the circuit layer. These pads are positioned directly above the conductive traces on the circuit layer. When a button is pressed, the contact pad makes contact with the corresponding conductive trace, allowing the electrical signal to pass through and activate the switch.

When a user presses a button on a membrane switch, the tactile dome collapses, creating a tactile sensation and giving the user feedback that the switch has been actuated. The tactile feedback can be further enhanced by the design of the graphic overlay, the choice of materials, and the force required to depress the buttons.

It’s important to note that there are different variations and designs of membrane switches, and the specific mechanism for providing tactile feedback and actuation may vary. Manufacturers can customize the tactile properties of membrane switches to meet specific requirements, providing different levels of tactile feedback, actuation force, and switch response.

How is the graphic overlay of a membrane switch designed and printed?

The graphic overlay of a membrane switch is designed and printed using various techniques and processes.

Here’s an overview of the typical steps involved:

Design: The graphic overlay is designed using specialized graphic design software. The design includes the arrangement of buttons, membrane switches manufacturer labels, icons, and any other visual elements required for the specific application. Important considerations include legibility, aesthetics, and compatibility with the overall product design.

Material Selection: The material for the graphic overlay is chosen based on factors such as durability, flexibility, chemical resistance, and aesthetic requirements. Common materials used include polyester (PET) or polycarbonate (PC) films, which are printable and can withstand environmental conditions.

Printing: The graphic overlay is printed using various printing methods, depending on the complexity, color requirements, and desired finish. Common printing techniques include:

a. Screen Printing: This method involves applying ink through a fine mesh screen onto the surface of the graphic overlay. It is suitable for solid colors, fine details, and opaque elements.

b. Digital Printing: Digital printing uses inkjet or laser technology to directly print the graphics onto the overlay. It offers flexibility, high-resolution printing, and the ability to print complex designs, gradients, and variable data.

c. Pad Printing: Pad printing transfers ink from a silicone pad onto the overlay surface. It is often used for irregular or curved surfaces and allows for precise registration of colors and details.

Surface Treatment: After printing, the graphic overlay may undergo surface treatments to enhance durability and resistance to environmental factors. This can include the application of a protective coating or lamination to protect the printed graphics from abrasion, chemicals, UV exposure, or fading.

Die Cutting: Once the printing and surface treatment processes are completed, the graphic overlay is die-cut to the desired shape. This involves using a steel rule die to cut through the material, creating the individual buttons, keys, or openings required for the membrane switch.

Embossing or Domed Features: If tactile feedback or domed areas are desired, the graphic overlay may undergo additional processes. Embossing creates raised areas on the overlay, while doming involves the application of a clear, flexible dome-shaped layer over specific regions.

The graphic overlay is then ready to be assembled with other layers of the membrane switch, such as the adhesive layer, spacer layers, and circuit layer. The final product provides both visual and tactile feedback to the user when actuated.

It’s worth noting that the specific printing and manufacturing processes may vary depending on the complexity of the design, the printing equipment available, and the requirements of the application. Manufacturers specializing in membrane switches can provide guidance and expertise in the design and printing of graphic overlays to meet specific customer needs.

How do different track link designs and configurations affect the performance of an excavator?

Different track link designs and configurations can have a significant impact on the performance of an excavator.

Here are some ways in which they can affect the machine:

Traction and Stability: The design and configuration of track links influence the excavator’s traction and stability. Wider track links with larger surface areas provide increased contact with the ground, resulting in improved traction, especially in challenging terrain conditions. This enhances the machine’s ability to maneuver and work efficiently.

Ground Pressure: The design of track links can affect the distribution of weight and the ground pressure exerted by the excavator. Some track link designs distribute weight more evenly, reducing ground pressure and minimizing the risk of sinking or damaging the ground surface. Lower ground pressure is particularly beneficial when working on soft or fragile surfaces.

Durability and Wear Resistance: The design and material composition of track links impact their durability and resistance to wear. Different designs may incorporate features like reinforced edges, hardened surfaces, or special coatings to enhance their wear resistance and extend their lifespan. This is particularly important in demanding applications or when operating in abrasive environments.

Noise and Vibration: Track link designs can have an influence on noise and vibration levels generated during excavator operation. Some designs incorporate noise reduction features, such as rubber pads or damping elements, to minimize the noise and vibration transmitted to the operator and surrounding environment. This can improve operator comfort and reduce noise pollution on job sites.

Track System Efficiency: The design and configuration of track links can impact the overall efficiency of the excavator’s track system. Some designs offer reduced rolling resistance, allowing the machine to move more smoothly and efficiently. This can result in improved fuel efficiency and reduced operating costs.

Maintenance and Serviceability: Track link designs may vary in terms of maintenance requirements and ease of serviceability. Some designs are specifically engineered for easy track link replacement, reducing downtime and maintenance costs. Additionally, features like self-lubricating components or sealed track link systems can minimize the need for frequent lubrication and maintenance.

It’s important to note that the specific impact of track link designs and configurations can vary depending on the excavator model, manufacturer, and intended application. Manufacturers typically provide recommendations and guidelines for selecting the appropriate track link design based on factors such as machine weight, operating conditions, and job site requirements. Considering these factors and working closely with the manufacturer can help optimize the performance of an excavator’s track system.

How are excavator track links connected to form a continuous track system?

Excavator track links are connected to form a continuous track system through the use of track pins and bushings.

Here is a step-by-step process of how the track links are connected:

Track Link Design: Each track link consists of two main components: the track shoe and the link assembly. The link assembly typically has holes or bores at each end to accommodate the connection with other track links.

Alignment: The excavator is positioned on a flat surface, and the track frame is leveled to ensure proper alignment of the track links.

Track Pin Insertion: A track pin is inserted through the aligned holes in the end of one track link. The pin is typically made of high-strength steel and has a head on one end and a threaded portion on the other.

Bushing Placement: A bushing, which is a cylindrical metal sleeve, is placed between the two track links. The bushing acts as a bearing surface and provides a smooth rotation between the track links.

Link Assembly Connection: The track pin is inserted through the second track link, passing through the bushing. The threaded end of the pin extends beyond the track link.

Threaded Nut Installation: A threaded nut is then screwed onto the threaded end of the pin. The nut is tightened using specialized tools or equipment to secure the track link assembly.

Torque Application: Once the nut is tightened, the track pin is torqued to the manufacturer’s recommended specifications. excavator track links in China This ensures that the connection is secure and prevents the track links from coming apart during operation.

Repeat the Process: The above steps are repeated for each subsequent track link until the desired track length is achieved. The number of track links required depends on the size and configuration of the excavator.

Final Inspection: After the track links are connected, a thorough inspection is conducted to ensure that all connections are properly made, and there are no loose or damaged parts. This is important for the safe and efficient operation of the excavator.

It’s worth noting that the specific process of connecting excavator track links may vary slightly depending on the excavator model and manufacturer. Proper installation and maintenance of the track links are crucial to ensure the integrity and performance of the excavator’s track system. Regular inspections and timely replacement of worn or damaged track pins, bushings, and other components are essential for optimal track system operation.

A Comprehensive Look at Adult Hygiene Products: China Adult Diaper Pants Manufacturers

Hygiene is a fundamental aspect of our lives, affecting our comfort, dignity, and overall well-being. For those dealing with incontinence, mobility issues, or undergoing potty training, adult diaper pants, diaper underpants, and potty training pants play a significant role in maintaining cleanliness and dignity. This article will explore these essential products, with a particular focus on China adult diaper pants manufacturers.

China Adult diaper pants manufacturers

China Adult Diaper Pants Manufacturers

China has a well-earned reputation as a global manufacturing hub, and this extends into the realm of adult hygiene products. Several reputable and established manufacturers produce high-quality adult diaper pants that are exported worldwide.

Manufacturers like Quanzhou Tianjiao Lady & Baby’s Hygiene Supply and Foshan Flying Medical Products are prime examples. They offer a range of adult diaper pants designed with comfort, absorbency, and discretion in mind. These products are crafted to provide users with superior protection, ensuring they can go about their daily activities with confidence.

The adult diaper pants from these manufacturers feature high absorbency cores, leak-proof barriers, and breathable materials for maximum comfort. Equally important is the affordability of these products. Despite their top-tier quality, these manufacturers manage to keep their products competitively priced, making them accessible to a broader range of consumers.

Adult Diaper Under Pants

Adult diaper underpants, also known as pull-ups, are an alternative to traditional adult diapers. They are designed to be worn like regular underwear, providing a more discreet and comfortable option for those dealing with incontinence.

These underpants typically feature an absorbent core and waterproof outer layer to prevent leaks. They also have soft, elasticated waistbands, making them easy to pull on and off. This feature makes them an ideal choice for those with an active lifestyle or those who prefer a more underwear-like feel from their incontinence products.

Manufacturers such as TENA and Depend have a wide range of adult diaper underpants that offer varying levels of absorbency to cater to different needs. These products, while slightly more expensive than traditional adult diapers, are a valuable investment for those seeking comfort, convenience, and discretion.

Adult Potty Training Pants

Adult potty training pants are a less common but equally important product in the realm of adult hygiene. They are typically used by individuals who are learning to manage their bladder and bowel movements due to certain medical conditions or procedures.

These training pants are designed to be easily removable, often featuring tear-away sides for quick changes. They have a moderate to high absorbency level, sufficient for accidents during the training process. Additionally, they are often crafted with a wetness indicator that changes color when the pant is wet, providing a visual cue for the wearer or caregiver.

Several manufacturers, such as Medline and Prevail, offer adult potty training pants. While they may not be as readily available as other adult hygiene products, they serve a crucial purpose for those in need.

Conclusion about adult diaper & potty training pants

Adult diaper pants, adult diaper under pants, and adult potty training pants are essential products for millions of people worldwide. They allow individuals to maintain their hygiene, dignity, and quality of life, regardless of their physical condition or stage of life.

China Adult diaper pants manufacturer, plays a crucial role in providing these products on a global scale. Their ability to produce high-quality, affordable adult diaper pants has made them a go-to choice for consumers worldwide.

However, the choice between traditional diaper pants, discreet pull-ups, or potty training pants ultimately depends on the individual’s needs and preferences. Each product serves a unique purpose, catering to different levels of mobility, incontinence, and personal comfort.

Regardless of the product chosen, the goal remains the same: to provide a sense of security, dignity, and hygiene to those who need it most. This goal is achieved through the tireless work of manufacturers, caregivers, and individuals committed to improving the quality of life for all, one diaper at a time.

What are some other options for storing yellow knit throw blanket besides a cedar chest or ottoman?

Here are some additional storage options for a yellow knit throw blanket:

Fabric bins or baskets

Breathable baskets or storage bins allow airflow while containing the blanket neatly.

Garment bags

Plastic or cotton garment bags protect against dust and can be folded/rolled to fit various spaces.

Vacuum compression bags

Removes air that causes wrinkles/mustiness. Great for short-term storage between uses.

Underbed storage containers

Clear plastic containers slide under beds for an out of sight solution.

Blanket ladder

Decorative wooden ladders designed specifically for draping and storing throws.

Cabinet or armoire

If you have extra shelving or hanging space in an unused cabinet or closet, this keeps blankets high and protected.

Trunk or chest

Decorative blankets chests or vintage steamer trunks provide aesthetic appeal along with proper storage conditions.

Attic or basement

As long as the area remains cool, dark and dry. Protection from direct light is important for color retention.

Proper folding/rolling and an airtight container are the keys to long-term yellow blanket preservation, regardless of the storage location.